
HiSkill Support
Real-world support for your virtual worksite
- Hiab Corporate
- HiPerform smart solutions
- HiSkill training simulator
- HiSkill support hub
How can we help you today?
Operators will find guidance on hardware setup, starting the simulator, and troubleshooting common issues.
Need immediate help? Email us at: training.simulator@digi.hiab.com
Administrator Hub

Getting Started with the Dashboard
The HiSkill Dashboard is a web service used to manage customer organizations, users, licenses, and devices.
You can access the dashboard here: https://simulator.hiab.com/

Think of a Simulator Kit as a classroom.

A license is a seat in a classroom with one month semester. Amount of licenses is the amount of people that can be in training simultaneously.

Users are all currently and previously trained operators with training data in the dashboard. Amount of users in Organisation is unlimited.

Organisation training administrator manages the licenses/seats and monitor the training data in the dashboard.
Dashboard User Roles:
- Organization Admin: Can add or delete users, assign and cancel licenses, view the training history of all users inside the organization, and view the organization's devices.
- User: Can only see their own training progress.
Dashboard User Types:
- Dashboard + Simulator: User is able to use the simulator and dashboard. They can see their training progress in the dashboard. This requires a valid email address.
- Simulator: User type is only able to use the simulator.
Managing users
Creating a user:

1.
Select the Users view, then select CREATE USER.

2.
Fill in the user information (Name, Group, Role).

3.
Enter a desired PIN for the user (they will use this to log into the headset).

4.
Add the user’s email address and phone number (optional).

5.
Select a license pool for the user.
Updating or Removing a User:
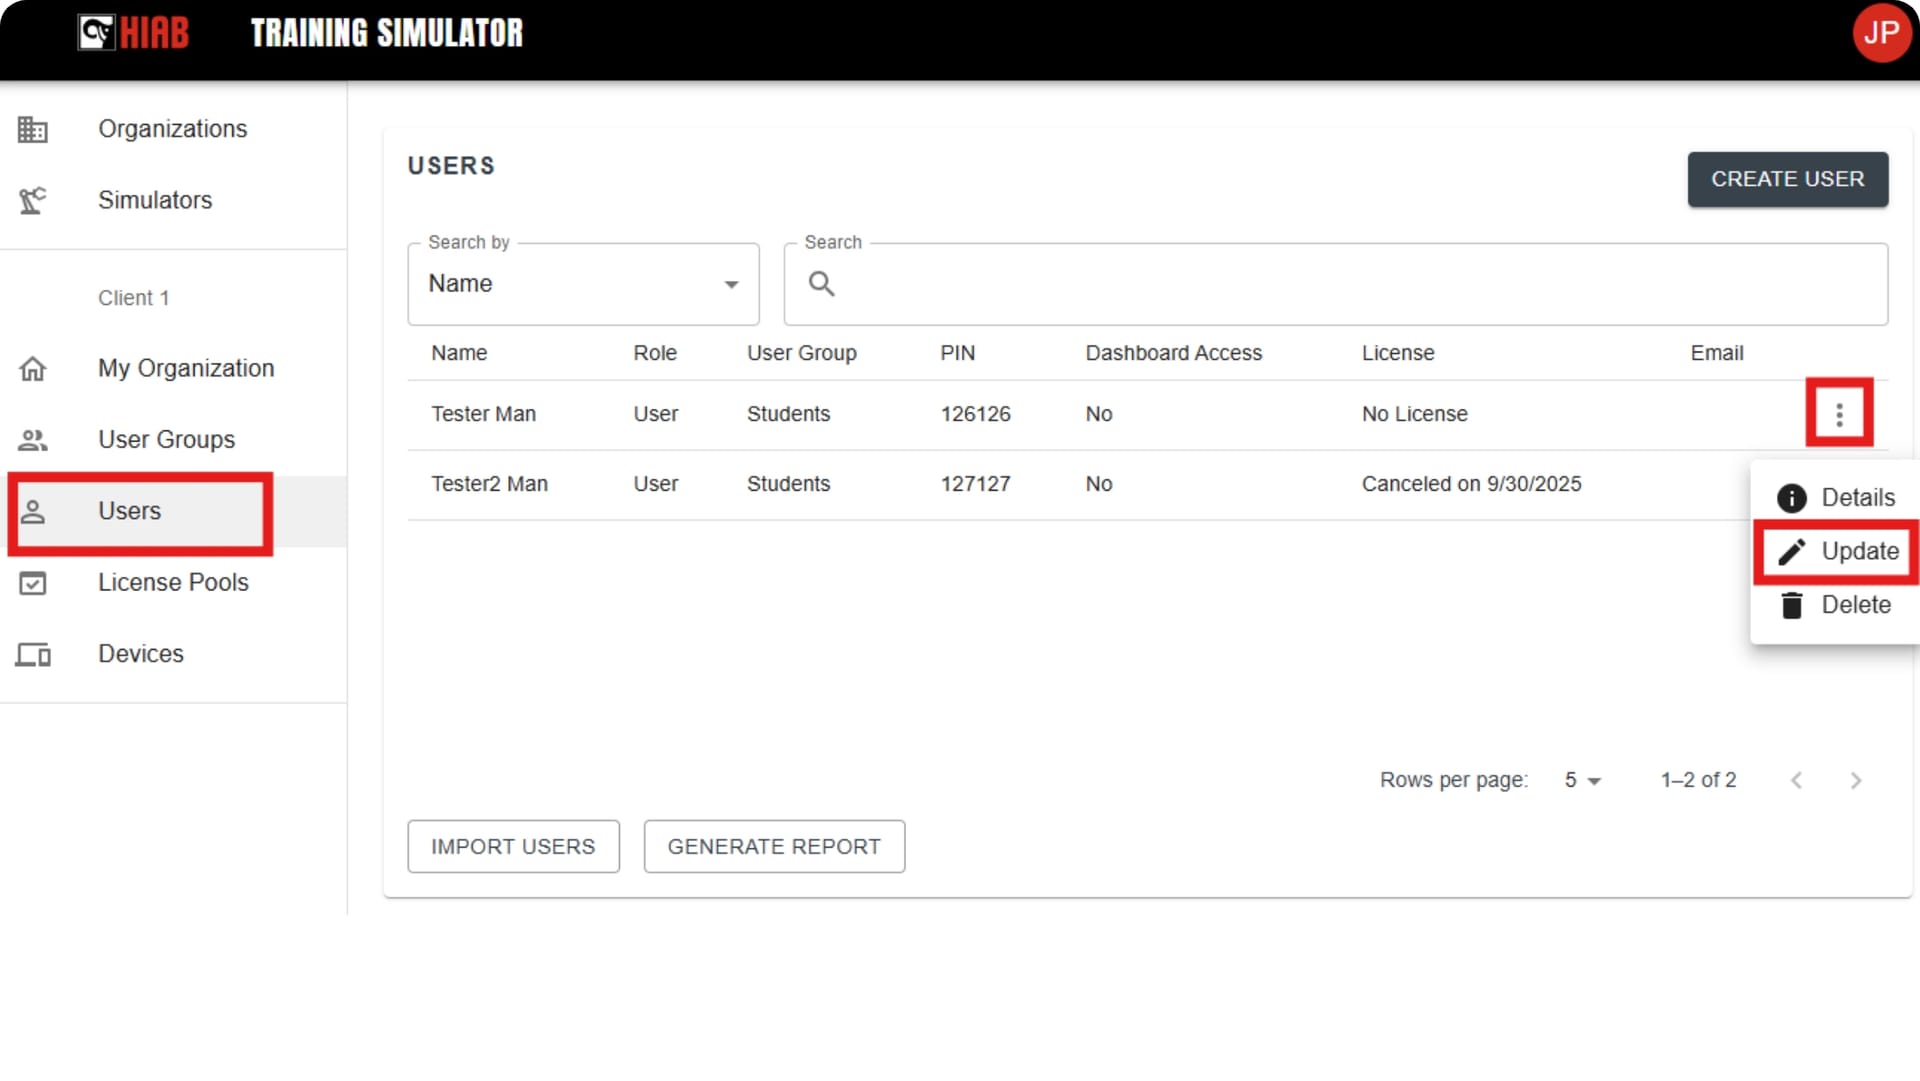
Update
Open the Users page, select the three dots on the right side of the user,
and select Update.

Delete
Open the Users page, select the three dots on the right side of the user,
and select Delete.
License & “Classroom” Management
Think of a HiSkill license as a seat in a classroom.

The 30-Day Learning Lock
To guarantee training quality, assigning a license locks that “seat” to that user for 30 days. This allows the operator to complete the full curriculum without rushing. After the 30-day period, the license is automatically released and can be assigned to a new trainee via the Dashboard.

Assign a License
Open the Users page, select the three dots next to the user, and select Assign License. (Only visible if the user has no active license).

Cancel a License
Select the three dots next to the user, and select Cancel License. (Only visible if the user has an active license).
Device Fleet Management & MDM Migration
Viewing Devices: The Devices tab lists all simulator devices connected to your company dashboard. When starting to use the service for the first time, a simulator code must be entered for each headset in https://simulator.hiab.com/device to connect them to your Organisation.

Log in
Log in to the site with your username/e-mail address and password.

Power button
Press the power button on the headset (On Quest 2 it is on the right; on Quest 3 it is on the left).

Guardian Area
Follow the on-screen instructions to use an existing Guardian boundary or create a new safe play area.

Connect to Wi-Fi
Standard: Open Quick Settings (click the clock/battery icon), select Wi-Fi, toggle it ON, choose your network, and enter the password.
Managed: Wi-Fi settings are displayed automatically.

License subscription
Depending on your license subscription, you have one or multiple simulators available. With license to simulator type, the simulator starts up automatically after instructed steps for adjusting headset fit. With a setup for multiple simulators, select the simulator you want to set up from the main menu displayed.

First-time startup
When the simulator is started for the first time a device code and instructions to connect the headset to your Organisation is displayed. Enter the device code to the dashboard.
Operator hub
Identify Your Headset Version
Before setting up your Wi-Fi or starting the app, check what your home screen looks like.

Option A: Standard Headset
You see a menu with an “App Library,” “Store,” and “People” icons.
-> [Follow Standard Setup]

Option B: Managed Headset
You see a simplified menu with only a few allowed apps, or the HiSkill app launches automatically. -> [Follow Managed Setup]
Hardware Setup & Basics
HiSkill comes in a protective case designed for convenient travel.
The Meta Quest does not require any additional hardware such as cameras or external sensors.

1. Power On
Press the power button on the headset (On Quest 2
it is on the right; on Quest 3 it is on the left).

2. Guardian Area
Follow the on-screen instructions to use an existing Guardian boundary or create a new safe play area.
3. Connect to Wi-Fi
Standard: Open Quick Settings (click the clock/battery icon), select Wi-Fi, toggle it ON, choose your network, and enter the password.
Managed: Wi-Fi settings are displayed automatically.
The CombiDrive Controller (CD3)
The CombiDrive 3 controller connects to the simulator via Bluetooth.

Power On
Release the red stop button on the right end by rotating it clockwise.

Status lights
A green light begins blinking. Once the connection is established with the headset, the light starts flickering.

Charging
Detach the battery from the bottom of the controller and attach it to the charger. Wait until the “Ready” light appears on the charger.
Start Your Training

1. Select HiSkill app
Select the HiSkill app from your App Library (or Managed Apps folder).

2. Log in
Log in to the app using your personal PIN set by your Organisation Administrator.

3. Pair the Controller
If the CD3 does not connect automatically:
• Go to Settings within the HiSkill menu.
• Press the Companion Device Manager button.
• Select “Allow” if it asks for access to the CD2/CD3 remote. The status should change to “Connected”.
Note: Ensure Location Services and “Nearby Devices” permissions are enabled in the Meta Quest settings.

4. Enable Hand Tracking
Go to Meta Quest Settings > Movement Tracking (or Device -> Hands and controllers) > Toggle ON Hand and body tracking.
Note: This is automatically on with new remotely managed Quest 3s devices.
Troubleshooting & Guides
Screen Casting (Sharing the View)
To share your application view with another screen, utilize the Meta Quest’s integrated casting feature.
Ensure that the VR headset is connected to the same Wi-Fi network as the receiving computer.

1.
Initiate an upward pinch gesture to open the Universal Menu.

2.
Locate and select Quick Settings in the bottom-left corner of the Universal Menu.

3.
Select the Cast (Off) option.

4.
To cast via a web browser, select the option displaying the web address and press Next.

5.
Connecting via Browser:
• Navigate to the provided link
on your computer.
• Enter the displayed 6-digit code
on the website.
• A notification will confirm casting
is active, and a red indicator dot will appear in VR.
6.
Select OK and return to the application using an upward pinch gesture.

7.
To stop sharing, return to Quick Settings and select Cast (On) > Stop Casting.